
Are you one of the millions of website owners who want to learn how to add WordPress meta tags without plugin?
“META TAGS” – A GAME-CHANGING element in SEO!
If you are trying to improve your SERP ranking, “Meta Tags” are something that can help!
Yes, it means MORE TRAFFIC, MORE SALES and MORE PROFIT!
Have you ever added Meta Tags to your web page? Do you want to know how to add WordPress Meta Tags without a plugin?
Well, in this technical guide, we’ll explain this process in pretty simple steps. We’ll also highlight some most important benefits of using meta tags!
Before proceeding further, let’s first understand what Meta Tags are and why they are essential!
What are Meta Tags?
Meta tags are the HTML tag segment containing critical web page information.
They describe the page content and help the search engine crawlers to know what the website or a web page is about.
Moreover, meta tags are visible only in the page’s code, placed inside the <head> element in the HTML document. One can see it simply by clicking anywhere on the web page. Right-click> source code.
Is it getting a bit technical?
Ok! Let me make it simple for you!
Meta Tags are the snippets of code that provides search engines with important information about your web page.
Meta Tags are the FIRST IMPRESSION and POINT OF CONTACT for all search engine crawlers.
Why are the meta tags necessary?
According to a webmaster trends analyst at Google, John Mueller, “meta tags can influence how users see your website in the search results and whether they actually click through to your site or not.
Again, Meta Tags are the FOUNDATION of SEO! They are the first thing you need to set up when creating a web page.
Combined with the on-page SEO process, it gives you magical results in improving the ranking of your website in SERP results.
These tags control how your entire digital picture is viewed and navigated. Let’s take a quick overview of how meta tags help-
1. Better For SEO
Optimizing a website for meta tags is beneficial for website SEO. Many professional bloggers and SEO specialists suggest optimizing websites for meta tags because it plays a vital role in on-page SEO. You can read in detail why meta tags are important in SEO.
Meta tags such as meta title, description, headers, Alt etc., give a proper structure to your content. If you ignore meta tags, you will end up with messy content that will hurt your search engine optimization.
Thus, one should add meta tags to their WordPress site for all pages and posts.
2. Helps Search Engines Index Pages Easily
Using meta tags correctly is like using the correct format for a professional email.
Using meta tags in the header section of pages will help search engines easily crawl and understand what the web page is about.
Thus, the more efficiently the search engine crawler fetches the content, the more quickly it will index the pages on Google.
3. Helps In Better Ranking
Meta tags improve your ranking, provided you use them appropriately.
By adding the targeted keywords in the meta title and the description, your web page gets a better ranking in SERP.
Google or any other search engine crawler reads through the title and description to check the relevancy of the theme a user is searching for.
So, if search engines can find relevant keywords in the meta tags, they advertise the content in the SERP to help readers get the most relevant results.
4. Improves Website Visibility
Meta tags are snippets of code that provide critical information about your web page to search engines.
They also help to find how many people will be inclined to click through to your website, affecting traffic and engagement rates.
Moreover, it tells web browsers how to show the content to visitors.
So, I think this is enough to make you understand the importance of meta tags. Now it’s time to know the different elements of meta tags.
Furthermore, if you properly understand the importance and purpose of each tag, you can quickly grasp how to add meta tags without the plugin.
Generally, there are 8 parts of meta tags-
- Title Tag
- Meta Description
- Meta Keywords
- Heading (Header) Tag
- Image Alt Attribute
- Robots Meta Tag
- Canonical Tag
- Schema Markup
Let’s discuss these, one by one-
1. Title Tag
The Title Tag is the primary HTML element. It specifies your web page for search engines and web browsers.
The Title tag supports all browsers, including Chrome, Firefox, Microsoft Edge, etc.
Always include the Title tag in the <head> section of the site.
Keep the following points in mind while creating a reasonable title tag-
- Long tail keywords make a difference! So, embed them in title tags.
- Add “modifiers” to this tag (How to |Review | The current year | Best | Top |Tips |easy |Find | Buy).
- Try to add numbers to your title tag (9 Important HTML tags for your website to improve your SEO)
- Keywords are important but don’t stuff the keywords unnecessarily.
- Start your title tag with your targeted keyword.
- Keep the title tag unique for every page.
- Try breaking up your title tag using a question, colon, or bracket and your agency name to enhance readability and brand recognition.
2. Meta Description
Meta Description is something that summarizes your web page. It is displayed in the search results below the Title tag.
Moreover, meta description significantly affects your page CTR as it displays in the search results.
Earlier in 2017, Google increased the length of snippets in search results. But now the meta description length is kept descriptive with 150-160 characters for optimal length, including spaces.
Key points to remember for writing a reasonable Meta Description tag-
- While writing a meta description, don’t put much stress on the number of characters. If needed, Google might fetch Meta description text from your content depending on a user’s query.
- Avoid duplicate Meta Descriptions.
- Include your primary targeted keywords in the descriptions.
- Embed clear Call-to-action (CTA) in your descriptions. Reach out to us, Apply today, Rely on us, Contact us today, Check-out, etc.
- Encourage visitors to click by creating specific and relevant content in the meta description.
- Include any discounts or special offers you’ve going on.
3. Meta Keywords
Meta keywords are the terms that help search engine crawlers to display your page in search results. You can use keyword tags in the description; you don’t have to stuff them unnecessarily in the description.
Most SEO experts and bloggers suggest embedding meta keywords in the description because of its benefits for on-page SEO.
Meta keywords appear bold in the meta description.
Points to remember while creating a meta keyword tag-
- Prepare a list of targeted keywords.
- Use the keywords in the description.
- Try to make the description more meaningful and relevant while placing the keyword.
- Try to use long-tail keywords.
- Place your most relevant keywords or phrases at the beginning of your list.
- Avoid using duplicate keywords.
4. Heading (Header) Tags (H1-H6)
Heading tags (HTML) are used to differentiate headings (H1) and subheadings(H2-H6) on your web page.
H1 is used for the title and is more critical than other tags.
Using the heading tags properly will improve the architecture of the content and helps the search engines to read and understand the well-organized content rather than to crawl through structural issues.
Important points to remember while writing header tags-
- Create headings related to the content of the page.
- Use the primary keyword in H1, but don’t populate the tags with keywords.
- Always choose the title to reflect the clear idea about the text used in the paragraph.
- Don’t overuse the labels to add keywords to them. Keep it readable for users.
- Make the tags unique.
5. Image Alt Attributes
Search engines cannot crawl images, an essential element of many websites. Alternative text (alt text) is a way around this issue.
The image alt attribute is included in an image tag to define its contents.
This tag is vital in terms of on-page optimization. Sometimes, if any particular image cannot be loaded (or if the images are disabled), Alt text is displayed to the visitors.
If search engines can’t see images, Alt attributes provide context.
Points to remember for Alt text tags-
- Create a relevant description without stuffing the keyword in the tag.
- Be clear and to the point.
- Create informative filenames.
- Develop an image sitemap.
- Try to fit the text in 50-55 characters (up to 16 words) in the alt text.
- Prefer a small file size for faster page loading speed (Just don’t compromise the image’s resolution)
6. Robot Meta Tags
The robot meta tag instructs the search engines to either index or not index the web page.
This tag has four critical elements for the search engine crawlers:
- FOLLOW –This attribute instructs the search engine crawler to follow all the links on that webpage.
- INDEX – This attribute tells the search engine crawler to index the entire webpage
- NOFOLLOW – This instructs the search engine crawler NOT to follow the page and any links on that webpage.
- NOINDEX – This attribute tells the search engine crawler NOT to index that webpage.
Furthermore, these tags help as they offer you specific control over your website when search engines examine it.
For instance, you may have created some pages with little value for users but are critical to have on the website for some reason. Suppose you don’t want such content to be considered to evaluate your website’s overall quality. In that case, the Nofollow attribute saves Google bot resources on content that is not unique.
Similarly, you may want some specific pages to stay out of SERPs as they feature some special deal that is supposed to be reachable by a direct link, such as from a newsletter. In this case, no index is of great help as it won’t waste Google resources unnecessarily.
Points to remember to create Robot meta tags
- Close unfinished/ unnecessary pages with thin content, no intent, and little value to appear in the SERPs.
- Close the pages that unreasonably waste search engine crawl budget.
- Be careful while using these tags, so you don’t mistakenly restrict important pages from indexing.
7. rel= “canonical” Link Tag
he lines highlighted in red show that any webpage where this tag appears should be treated as a replica of the specified URL.
The rel=” canonical” link tag is the technical solution for managing duplicate content.
Multiple pages with almost similar content covering the same topic or when the same page is available under different URLs may confuse search engines. Thus, it would help if you tell search engines which URL you wish to rank with.
You can do so by using the canonical tag. Adding the canonical element to a URL instructs search engines that’s the one they should display in their results. It will help you to steer your SEO efforts in one direction.
Points to remember to use canonical link tag-
- Use the canonical tag for pages with similar content on the same subject.
- Implement canonical tags for duplicate pages available under multiple URLs.
- If the two pages connected by a canonical tag vary too much in content, the search engine crawler will disregard the title.
8. Schema Markup
Schema markup is a tag for arranging the data on each web page. It helps the search engines to understand your content and better represent it in the search results.
Having a structured schema markup is important for improving your SERP ranking. It helps search engines read the text on web pages and help them understand what specific words relate to.
While you implement structured data markup from schema.org, you can get a competitive advantage, boost CTR (click-through rate), generate additional traffic, and improve organic search results cost-effectively.
When you use Schema Markup, the user does not even need to click through the results to get the answer to the query. They will get a rich snippet with an attractive image, specified price range, operating hours, stock status, a 5-star rating, or whatever is helpful. Furthermore, it is more likely to grab the user’s attention than a plain-text result.
- Use the schema markup carefully (use Structured Data Markup Helper if required).
- Test the markup thoroughly to ensure it isn’t added improperly or misled.
- Create a map of your most relevant pages and finalize the concepts relevant to each page.
I think, by now, you are clear about the different types of meta tags and their importance, so let’s quickly get into how to add meta tags in WordPress without a plugin.
How to Add WordPress Meta Tags Without a Plugin?
Again, adding meta tags without plugins gives your WordPress website a cleaner look.
I’ll explain the process of adding meta tags without a plugin. But before you start, I suggest you backup your WordPress website so that you can retrieve your website data again if anything goes wrong,
Let’s take a look at how the process starts-
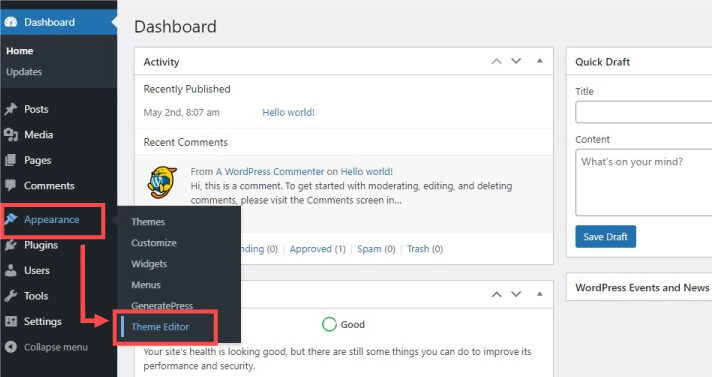
Step 1: Go To Appearance> Theme Editor
First, start by logging in to your Dashboard. Go to appearance on the left pane and then the theme editor.
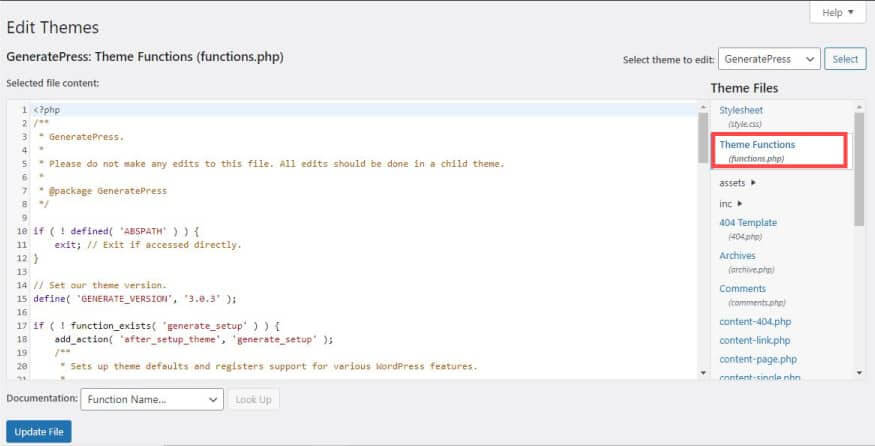
Step 2. Go to Theme Functions (header.php) File
As you click on the Theme Editor, you’ll be able to see the backend of the activated theme of your WordPress site on your screen.
As shown in the image below, click on Theme Function (function.php) file displayed on the right pan under Theme Files. This will display the function PHP file of the activated theme file.
Step 3. Add The Code Into The function.php File
Now, include the meta tags on the theme function file. To do so, copy the code from the below box.
function add_meta_tags() {
global $post;
if ( is_single() ) {
$meta = strip_tags( $post->post_content );
$meta = strip_shortcodes( $post->post_content );
$meta = str_replace( array(“\n”, “\r”, “\t”), ‘ ‘, $meta );
$meta = substr( $meta, 0, 160 );
$keywords = get_the_category( $post->ID );
$metakeywords = ”;
foreach ( $keywords as $keyword ) {
$metakeywords .= $keyword->cat_name . “, “;
}
echo ‘
<meta name=”description” content=”‘ . $meta . ‘” />’ . “\n”;
echo ‘
<meta name=”keywords” content=”‘ . $metakeywords . ‘” />’ . “\n”;
}
}
add_action( ‘wp_head’, ‘add_meta_tags’ , 2);
- Now, scroll down the function.php file (as in the below image) and go to the bottom where the HTML codes end.
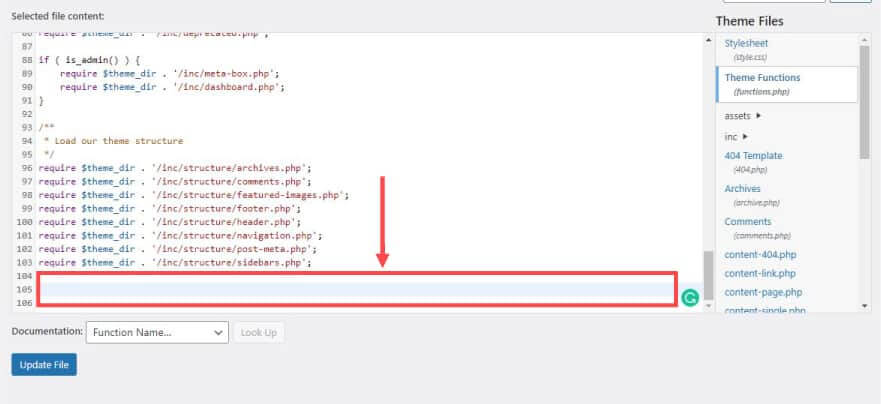
- And it’s time to paste copied meta tags code in the red highlighted area as seen in the image below.

Once you have successfully pasted the copied code in the function.php file, you’re DONE.
That’s it! Congrats!
Furthermore, this code will automatically get the initial 160 characters from the first paragraph of any page and post and display it as a description.
Note: If you switch your WordPress website to a new theme, you’ll have to repeat the process and paste the code again.
Why Add WordPress Meta Tags Without a Plugin?
The most common question that may come to mind during the process is why add meta tags without using plugins when we have a list of some of the most powerful SEO plugins.
Did this question come across your mind too?
Ok! Let’s understand the importance and the advantages of adding meta tags without any plugins!
- The foremost reason not to use a plugin is that it affects the site’s speed. It makes your WP website slow.
- While adding meta tags manually, you can notice a slight improvement in your website’s performance.
- Adding meta tags without a plugin helps you avoid unwanted scripts generated by SEO plugins.
Wrapping Up
As you have learned about meta tags, their importance and the necessary code on how to add meta tags in WordPress without a plugin in this blog, you can start creating your meta tags yourself.
Furthermore, meta tags on your website help search engine crawlers to search your metadata information.
Remember, your meta tags should be clear and understandable to make it easier for search engine crawlers to find your content. Finally, you don’t need to go through multiple plugins to create your meta tags. Follow the steps mentioned above to walk on the right path for your website’s success.
We would love to know how you found this blog. If it is helpful, share it on social media and in the blogging community to help others.
Lastly, share your views in the comment section if you have any queries or suggestions regarding this blog.